【T7b】複数のモデルクラスの連携(9/9)
| プロジェクトタイプ | (注意: 本文参照) |
|---|
| プロジェクト名 | T7b |
|---|
| ソリューション名 | PIT7 |
|---|
注意
- 本ページの作業内容は 前のページまでの続き になっていることに注意せよ.
- 先に前のページまでをすべて読み,指示されている作業を済ませてから本ページを読むこと.
- プロジェクトの作成作業については準備作業を参照せよ.
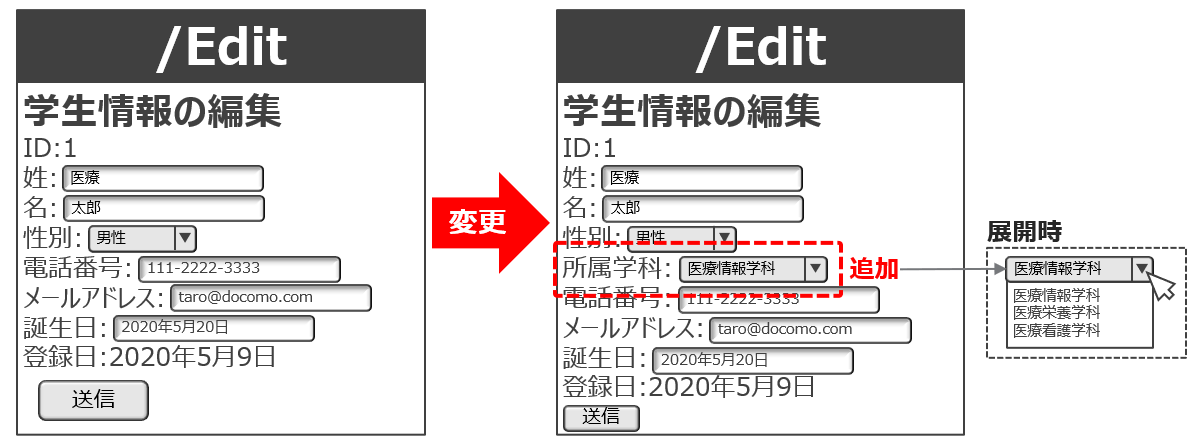
7b-9. 「学科」のための Edit アクションの変更
最後に図7b-7-1③のEditアクションのビューを変更しよう.
_に示すように,Createアクションのビューと同様に編集画面に
ドロップダウンリストを追加するのみである.
Editビューの変更点ここまで来たのであれば,もはや新しい技術的要素は必要ない.
Controllers/StudentsController.cs のEditアクション(GET用)に_に示す内容を,
またEditアクション(POST用)を_に示す内容をそれぞれ追記しよう.
StudentsControllerクラスの変更内容 1
2
3
4
5
6
7
8
9
10
11
12
13
14
15
16
17
18
| // Editアクション(GET用)
public IActionResult Edit(int? id)
{
if (id == null)
return NotFound();
var student = (from s in _context.Students
where s.Id == id
select s).FirstOrDefault();
if (student == null)
return NotFound();
SetupDepartmentList(); // 編集時のフォームでも「所属学科」のデータがが必要なので,
// SetupDepartmentList() メソッドを呼び出しておく.
return View(student);
}
|
StudentsControllerクラスの変更内容 1
2
3
4
5
6
7
8
9
10
11
12
13
14
15
16
17
18
19
20
21
22
23
24
| // Editアクション(POST用)
[HttpPost]
[ValidateAntiForgeryToken]
public IActionResult Edit(int id, Student student)
{
if (id != student.Id)
return NotFound();
if (ModelState.IsValid)
{
_context.Update(student);
_context.SaveChanges();
return RedirectToAction(nameof(Details), new { id = student.Id });
}
else
{
SetupDepartmentList(); // 入力に誤りがある場合は,再びフォームを表示させる必要がある.
// このため「所属学科」のデータを .ViewBag に入れておく必要があるので,
// SetupDepartmentList() メソッドを呼び出しておく.
return View(student);
}
}
|
次に Views/Students/Edit.cshtml を_に示すように変更しよう.
Views/Students/Edit.cshtmlの変更内容 1
2
3
4
5
6
7
8
9
10
11
12
13
14
15
16
17
18
19
20
21
22
23
24
25
26
27
28
29
30
31
32
33
34
35
36
37
38
39
40
41
42
43
44
45
46
47
48
49
50
51
52
53
54
55
56
57
58
59
60
61
62
63
64
65
66
67
68
69
70
71
72
| @{
ViewData["Title"] = "学生情報の編集";
if (Model is null) throw new ArgumentNullException(nameof(Model)); // ad-hoc! 非null保証のための回避策
}
@model Student
<form asp-action="Edit">
@* IDの表示(これは編集させない) *@
<label asp-for="@Model.Id"></label>:
<input type="hidden" asp-for="@Model.Id" />
@Html.DisplayFor(s => s.Id)
<br />
@* 姓(LastName) のための入力欄 *@
<label asp-for="@Model.LastName"></label>:
<input asp-for="@Model.LastName" />
<span asp-validation-for="@Model.LastName"></span>
<br />
@* 名(FirstName) のための入力欄 *@
<label asp-for="@Model.FirstName"></label>:
<input asp-for="@Model.FirstName" />
<span asp-validation-for="@Model.FirstName"></span>
<br />
@* 性別(Sex) のための入力欄 *@
<label asp-for="@Model.Sex"></label>:
<select asp-for="@Model.Sex" asp-items="Html.GetEnumSelectList<SexType>()"></select>
<span asp-validation-for="@Model.Sex"></span>
<br />
@* 所属学科(DepartmentId) のための入力欄 *@
<label asp-for="@Model.DepartmentId"></label>:
<select asp-for="@Model.DepartmentId" asp-items="@ViewBag.DepartmentList"></select>
<span asp-validation-for="@Model.DepartmentId"></span>
<br />
@* 電話番号(PhoneNumber) のための入力欄 *@
<label asp-for="@Model.PhoneNumber"></label>:
<input asp-for="@Model.PhoneNumber" />
<span asp-validation-for="@Model.PhoneNumber"></span>
<br />
@* メールアドレス(Mail) のための入力欄 *@
<label asp-for="@Model.Mail"></label>:
<input asp-for="@Model.Mail" />
<span asp-validation-for="@Model.Mail"></span>
<br />
@* 誕生日(Birthday) のための入力欄 *@
<label asp-for="@Model.Birthday"></label>:
<input asp-for="@Model.Birthday" />
<span asp-validation-for="@Model.Birthday"></span>
<br />
@* 登録日時(Registered)の表示(これは編集させない) *@
<label asp-for="@Model.Registered"></label>:
<input type="hidden" asp-for="@Model.Registered" />
@Html.DisplayFor(s => s.Registered)
<br />
<input type="submit" value="送信" />
</form>
<a asp-action="Details" asp-route-id="@Model.Id">詳細に戻る</a>
@section Scripts
{
@{ await Html.RenderPartialAsync("_ValidationScriptsPartial");}
}
|
ここまで書けたら実行してみよう.一覧から適当な学生をクリックして学生の詳細画面(Details)を表示させ,
「編集」をクリックして編集画面(Edit)を表示させて,「所属学科」を変更して「送信」ボタンをクリックしてみよう(_~_).
_に示す通り,詳細画面に遷移して「所属学科」への変更が反映されたことが分かるだろう.
実行結果ここまでを確認できたら今回のチュートリアルは完了である.
なお今回は課題が出題されている.忘れずに取り組むこと .
Last updated on 2024-06-10
Published on 2024-06-10